Shot Put: The Ultimate Guide to Throwing Far
If you want to become an elite shot put thrower, you need to learn everything you can. You have to become obsessed. That’s why I created this guide. Below, you’ll find ten years of learnings consolidated into one article to benefit all throwers – regardless of their experience.
Our Recommended Gear for Shot Put
First, the best shot put athletes are the ones that make an investment into the right gear. In my ten years of experience, here are my favorites:

Saucony Unleash SD Throwing Shoes
The Saucony Unleash SD throwing shoes have recently become our favorite throwing shoes on the market. Historically speaking, I also really love these shoes. The biggest advantage of this shoe is its ability to quickly move. The sole is built perfectly to allow for your foot to continue rotating through the finish. Some people will argue that this is too fast, but in my experience, if you can hit a decent position with these shoes on, the shot put is going to go very, very far. I have also seen people only use this on their dominant foot, while keeping another shoe for stability at the front. I have tried that before and cannot say that I am an advocate.

Rogue Fitness Wrist Wrap
To the outsider, a wrist wrap might look like an unnecessary accessory when throwing shot put. Let me correct their naive thinking: it’s absolutely necessary. Let’s just do basic math and estimate that you take 20 throws in a practice and you practice three times a week. That puts you at about 3,200 repetitions per year. That means over the course of your high school or college career, you’ll take around 12,800 throws in total. With nearly 13,000 throws under your belt, you need to be careful and protect your wrist. Without your wrist, you can’t throw! If you want to check out more about my opinions on wrist wraps, check out my article: “Wrist Wrap for Shot Put: Necessary or Placebo?“

Champion Sports Iron Shot Put
The best shot put for practice is one that you can get a large quantity of. I remember when I first started to take my training seriously, I bought around ten 12lb shot puts to practice with. Overall, I think it was an investment of $200-$300 that ended up lasting me all four years of high school. If you can afford something more expensive, that’s great, but I would invest most of your money into having 8-10 shot puts that work for practice and about 1-2 for a competitive meet.

Porta-Circle: A Portable Shot Put Circle
This one is optional, but one that I could have certainly benefitted from while I was training. The convenience of always having a circle available is so important to have a competitive advantage over others. Remember, when you’re not training, others are. Porta-Circle holds you accountable, and eliminates the excuse of “the circle not being open” or that “the circle was rained on”. It allows you to take your training indoors, outdoors, or wherever you want to be to train. I really wish I had this while I was competing because I can’t even begin to tell you how much chalk I wasted drawing horrible circles estimating 7-8 feet in diameter.

The Perfect Shot Put Practice Routine
I practiced both shot put and discus for ten years, and used the following strategy to work through my practices consistently:
- Power Throws (1-5)
- Half Turns (1-5)*
- South Africans (1-2)*
- Full Throws (8-30)
I put an asterisk next to half turns and South Africans simply because I would skip them sometimes. I would work on them as needed. If I was having an issue with getting my left down quicker, I would do more half turns.
In college, we were often told to “listen to our body” – if you were feeling great, then go for a great practice. If you were not feeling great, take a break and diagnose the issue. If you truly cannot continue on with the practice, head to the local athletic trainer to get yourself checked out.
The Perfect Practice Journal
It’s easy to get caught up in the numbers, so if you’re someone who will psyche yourself out due to the numbers, then ignore this section.
One of the easiest ways to keep track of your progress is by measuring everything. If you really want to become great, you will start logging everything, including your caloric intake, the number of throws you take at practice, and your best distance for the day.
In my journal, I simply had an Excel document that held me accountable for doing things like stretching, taking my supplements, and drinking adequate water. While I did find this to be effective, I also felt it to be pretty taxing. A lot of this is about routines. If you are able to develop a habit that benefits you athletically, that’s a job well done.
If you don’t like Excel, that’s totally fine! At least make sure to keep a detailed training journal to keep up with your progress.
I would highly recommend creating a “Scorecard” for yourself every week. Figure out your yearly goals, divide that by 50 or even 52, and that will give you what you need to do on a weekly basis to achieve that goal. I recently learned this from a book called Traction. While it is mainly applicable to business, you need to keep in mind that your body itself is a business. The better numbers that you put up in the weight room and on the track, the more scholarship and freedom you will have in the future.

The Importance of Technical Analysis
I recommend having a separate recording device for just track & field. That way, your phone won’t be completely filled with videos upon videos of you throwing, and you can separate yourself from that when you’re outside of practice. It also helps because that recording device will have fewer distractions, and its sole purpose will be to help you look at your videos. When you record, I would recommend filming vertically to ensure you’re getting your entire body. Make sure when you record to keep the camera fixed on you. Do not follow the shot put, as you’ll want to see your finish clearly.
It’s best to have a recording setup for when you practice. I used to place my iPhone in a shoe all the time to be able to record, but in reality, I should’ve made the investment to purchase an iPhone stand or even a separate video recorder. While a stand can be a little heavy in your bag, it’s all worth it so you can have a hands-off practice.
Later, upload all of your videos to Google Drive (again, have a separate account for this) and delete the videos of your iPhone. To send out the videos to others, you should re-download and send them to them, but primarily, you should give yourself at least 20 minutes a day to view your previous day’s practice (objectively) and come up with a game plan for the next practice.
Re-watching your own videos for new clues is one of the easiest ways to get better.
Check-In’s with Coach
It’s important to you to have a monthly check-in with your coach in the offseason, and a weekly one with your coach during the season. In the offseason, you’re going to want someone to hold you accountable. I wish I would’ve done this more with my coach, as he would’ve helped me tremendously if I had just utilized the summer to be able to train. During the season, you’re going to want to take an opportunity to reflect and think about every competition. No matter how great or how bad the meet went you should go through a process that allows you to amply reflect.
Shot Put Spin vs. Glide Technique
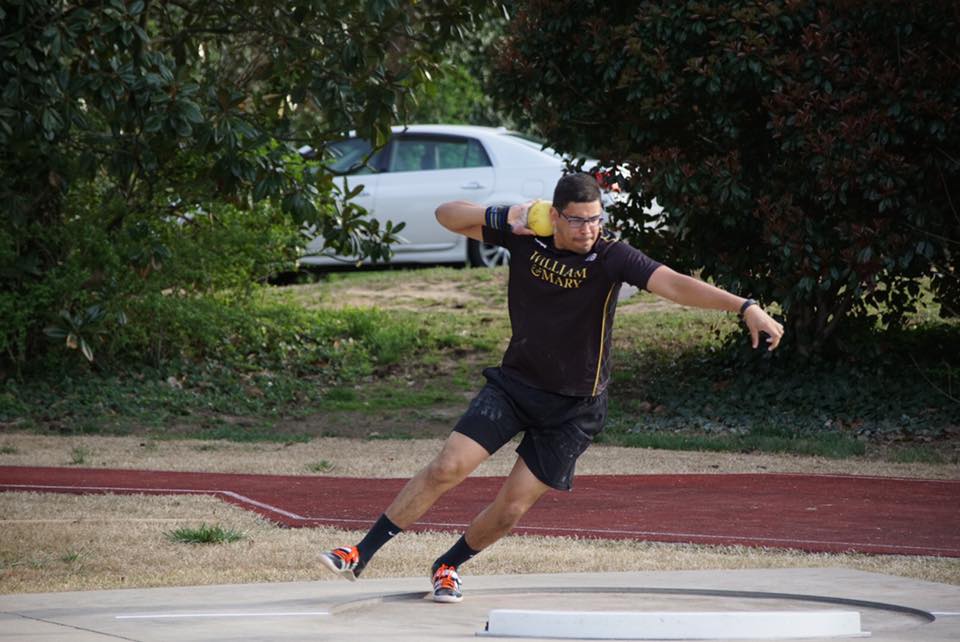
Out of the ten years that I competed, I spent my first four years using the glide and ended up switching to a rotational for the remainder. Speaking from personal experience, I had greater success as a rotational thrower than as a glider because I have always been on the lighter side. In high school, I weighed 180lbs and was throwing around 55+ feet consistently. I made the switch to the rotation in high school after plateauing at 45 feet for a couple of months. The first meet with my new spinning technique, I ended up getting a new personal record by two feet.
I believe that anyone can be successful in either one of these techniques, however, I recommend all my athletes at least try both in their careers. Oftentimes, I’ll see students be afraid to use the spin technique in meets and will resort back to their “roots” and throw out of a glide. If you have put ample time into practice, you will succeed. Allow yourself to make mistakes, and take the chance of doing rotational at a meet, you might surprise yourself.
The other reason that I tell my students to use the rotational technique is that if you go to any collegiate meet, you will see that 95% of the athletes there are using the spin technique. Most college coaches prefer to teach the spin technique, and will definitely want you to make a switch in college. The only people that I have seen successfully throw out of a glide are incredibly fast and have a large frame. Even then, athletes with large frames benefit greatly from the rotational technique.
The Secret to Being Recruited for Track & Field
The secret to being recruited for Track & Field is having the right mentor to guide you to sign your National Letter of Intent. Sure, you can do it on your own, just as several other athletes have done in the past, but to truly get the most out of your opportunity, you should sign up for a program like Torch College Recruiting. Torch College Recruiting is an online platform that connects track & field athletes to collegiate coaches in all divisions. It is by far the most cost-effective product in the industry and truly provides so much value. I would recommend just signing up for a free account at first, but if you do end up joining the paid version, make sure to use the promo code VLAD.
- Athletics: If you’re trying to get recruited for Track & Field, there’s a few things that matter. Mainly, it’s your official personal record in your respective events. No, I’m not talking about your “practice personal record”. I’m talking about actually being official on the MileSplit or Athletic.NET websites.
- Academics: After being a Division 1 Track & Field athlete for four years, I can tell you that balancing both academics and athletics is no joke. Coaches will often look at your academics in high school to see if you’ll be a good fit for their school. I had a 3.5 GPA in high school, which gave me the opportunity to look at some prestigious institutions.
Men Shot Put Recruiting Standards
In order to get recruited as a male shot putter, you have to meet the following standards:
| Shot Put Personal Record | Divison |
| 55’0″+ | Any |
| 50’0″-55’0″ | D2, D3 |
| 45’0″-50’0″ | D2, D3, NAIA |
Female Shot Put Recruiting Standards
| Shot Put Personal Record | Division |
| 42’0″+ | Any |
| 32’0″-42’0″ | D1 (Walk-On), D2, D3, NAIA |
9 Cues to Help You Throw Shot Put Farther
If you are trying to get better at shot put, there are certain mental cues that you have to keep in mind as you go through the circle. My suggestion would be that you only think about one cue at a time. Thinking about more than one or two cues per practice is a recipe for disaster.
Cue #1 – When your left foot lands in the front, keep it down and turn your right foot through.
“Just think of a door being slam shut. The edge stays locked in place, but allows for the door to turn and completely closed.” One of my high school coaches taught me this, and it has really stuck with me throughout my career.
To practice this cue, I would try start from scratch really. A lot of throwers have the tendency to just shift their weight to throw. This is an extremely bad habit and should be fixed immediately. While it will take a little while before mastering this part, it will add significant distance to your throws. To warmup every practice, I would usually take 8-10 half turns to begin and really focus on this “door” concept.
Cue #2 – Focus on your left foot getting down quickly to transfer energy into the shot put.
A lot of coaches will say ” pinch your knees together in the middle of the circle”. Their main reason why they give this cue is because they want your feet to get down faster. One athlete who was incredible at keeping their left foot down was Justin Rodhe.
By keeping getting your left down quickly, you’re actually able to create a large stretch – called by many as “chest-hip separation”. Essentially, this is the fundamentals of shot put. When you’re in your power throw, your lower body will be facing to your right/left and your upper body will be pointed to the back of the circle. As your right foot turns, it will create a massive stretch and torque to help you launch the shot put.
In conclusion, you can find a ton of FREE content online that you can leverage to become a better shot put thrower.
Cue #3 – Keep your left foot loaded out of the back of the circle.
In some of my training sessions, my fellow teammates would often say “get left”. It was a cue to keep your left foot loaded out of the back of the circle. One professional that demonstrates this greatly is Ryan Crouser. When he throws, it looks like he’s throwing in slow motion. That is because out of the back, he’s loading that left foot to create as strong drive to the middle.
Another way you can practice this is by using either 180 or 360 drills. Both of these drills are things that you can immediately implement into your practices. These drills will help you keep your weight on your left foot (or right if you’re a leftie). When I was in high school and first learning this concept, I would always start out my practices with 180’s. After successfully landing at least 10 180’s in a row, then I’d move to 360’s. Consistently starting out practice also helped set my mindset. Those two drills are easy to breeze through, but ensuring that you do every rep with excellence will help you to have a great practice.
Cue #4 – While your setup can be custom tailored to your style, it needs to be balanced.
Every shot putter has a different body type. Therefore, you’ll see professionals like Tom Walsh have a completely different technique than Ryan Crouser. Although it looks different, it really isn’t. They may start differently, but they both allow these technicians to hit the same positions in the middle and at the finish.
So if you’re winding back and forth, I would recommend to start trying to limit that. You may think that this is giving you more momentum, but you’re actually killing some of your distance because of it. If you’re constantly rocking back and forth at the beginning of your throw, you’re practicing inconsistency. You’ll have to create a setup that is consistent so you can hit positions better. As you become more advance, you can then tailor your entry to what might work for you.
Cue #5 – Keep your left arm parallel to the ground.
When you’re coming out of the back, it’s very easy to forget about the importance of your left arm. Because your left arm is a crucial part of your block, you need to be cognizant of the impact it can have on your throw. As you keep your arm parallel to the ground, it will allow you to wrap your arm in the middle. The master of this was Adam Nelson.
By wrapping your arm, you are actually able to create greater separation in the middle of the throw. The above video demonstrates the importance of this.
Cue #6 – Bring the intensity to in competition throws.
Don’t get me wrong, I’ve seen some great throwers show no sort of emotion after hitting a big PR. Not everyone has to do it. But for me, I had to emotionally connect myself to get into the zone. I had to visualize myself throwing far weeks before the event. Intensity brought an amazing culture to this event. It allows you to truly get into the zone.
Cue #7 – Treat every practice like it’s a competition with your best self
Disclaimer: You should always check with your healthcare professional first before taking pre-workout or any competition supplement.
I’m not saying go out every practice, because there is serious value in pinpointing areas of technique and honing in on them. However, I’m saying that you should get in a habit of saving your throws. Yes, it’s important to get after it in practice. However, if you consistently practice and casually step out of the circle, you’re going to do the same in a meet. Trust me. I had a slew of meets, even one where I fouled out of both events. It’s not fun, so just make sure you’re keeping everything in the circle. That being said, be smart about the throws you decide to keep in the circle. If its raining, it’s probably best to just let it go. Stay inside the circle the best you can, but understand your limits.
If you want to hype yourself up before a meet, I’d recommend drinking coffee. Coffee will bring you to a perfect balance between feeling too hyped up and feeling calm. I’ve been to meets where I had way too much pre-workout. Don’t get me wrong: pre-workout is great in moderation. It can help wake you up on early mornings you have to throw, but you have to play around with the serving size you give yourself.
Additionally, always check if that brand/supplement is approved for NCAA or HS.
Lastly, do not compare yourself to others. Honestly, the last thing you should be looking at is MileSplit. I had friends that would obsess over numbers and would constantly compare themselves to others. They would know everything about their competitors, even going as far as looking them up on Facebook, Instagram, and other social media platforms. Let me tell you this: don’t worry about them. You cannot control how they perform on meet day. The only thing that you can control is your mentality and your preparation prior to a competition.
Cue #8 – Record the Majority of Your Full Throws
Whether you have a smart phone or camera, you should always be recording your throws. More importantly, you should quickly evaluate your throws in practice, and see what exactly is working. If you continue practicing and are not trying new things, you’re going to get the same results. Mix it up, and see what makes the shot go further.
Here’s the secret to throwing far: after every practice, watch a few videos and document online or in a journal what you did well, and what you can improve on. That way, you are listing the positives and seeing your progress, but also pinpointing what can be improved. As you record your videos, you can try different angles. However, the best angle to record and get the best type of video analysis is from the back of the circle. I’ve literally used a sneaker as a camera stand before, but you can also purchase a camera stand to gain consistency.
Cue #9 – Know Your Body & Listen to Your Coach
Many athletes often DM me or email me asking how they can get better. The difference between those who just reach out and those who get better are the ones that actually follow my advice. I’ve provided immense value to several athletes over the years, but I’d probably say about 90% of them only follow it for two weeks. The 10%, however, who do stick with it, have become a force to be reckoned with in the shot put world. Listen to your coach. While your knowledge may exceed theirs, they have an outside perspective. Always consider that they are also trying to help you reach your goals.
The first thing you need to keep in mind is listening to your body. If your wrist is hurting, let your coach know and go to the trainers. Your calf is hurting? Let your coach know and go to the trainers. If you try to push through a potential injury, that’s how you end up getting injured. Know your body and your limits. If something doesn’t feel right, take the safe road. Especially consider this right around peak season.
How Often Should I Be Throwing?
In high school, I would throw shot put at least four times a week, 51 weeks of the year. The majority of my throwing sessions would look like this:
The difference between someone who is throwing 35 feet and 55+ feet is consistency. I threw on days where it was beautiful outside, and I’ve also thrown on days that were horrible. Let me tell you: you do not know true pain until you throw the 20 pound shot put in the blistering cold and have it roll back on your fingers.
That is exactly what it’s all about. The grind to get consistently better. One thing that you need to have accountability. It’s easy to start on this workout plan for the first week, but what is difficult is continuing with it.
Frequently Asked Questions About Shot Put
Many officials get this wrong, but you should always measure a shot put throw from the inside of the toe board. It wouldn’t be the outside of the toe board simply because the body cannot and is not supposed to reach this area. Measuring from inside the toe board mimics the release point of the thrower.
The shot put technique is all about personal preference. While most professional throwers like Joe Kovacs and Ryan Crouser will use the spin technique, the glide has often dominated the podium with throwers like David Storl and Ulf Timmermann.
Shot putters should try to practice as often as possible. At the peak of my training, I would train year-round taking anywhere between 8 to 25 throws depending on the season. The general rule of thumb is to take higher volume throws during the summer and use the winter season to use heavier implements.